Microsoft’s new operating system, Windows 10, comes with the integration of OneDrive (formerly known as SkyDrive ), Microsoft’s official online cloud storage and file storage service. Windows 10 allows you to save your documents and files directly on your OneDrive account right from Windows Explorer or other software programs. Because of seamless integration with OneDrive, you don’t need to download or install any OneDrive apps. Just use the same OneDrive storage as the hard drives in your Windows 10 computer.
However, many Windows users may not want to use the OneDrive cloud storage service, and they want to disable the OneDrive function in Windows 10 to save system resources.
Today in this tutorial, we will show you many ways to disable the OneDrive feature in Windows 10. So without wasting time, let’s start the tutorial:
Method 1: Disable OneDrive from System Startup in Windows 10
When you start your Windows 10 computer, the OneDrive application automatically starts and is located in the Taskbar notification area (or system tray). You can disable OneDrive from startup, and it will no longer start with Windows 10:
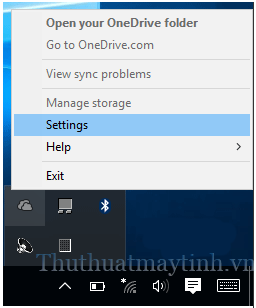
1. Right-click the OneDrive icon in the taskbar notification area and select the Settings option.
2. It will open the OneDrive Settings window. Now go to the tab ” Settings ” and uncheck the option ” Start OneDrive automatically when I sign in to Windows “.
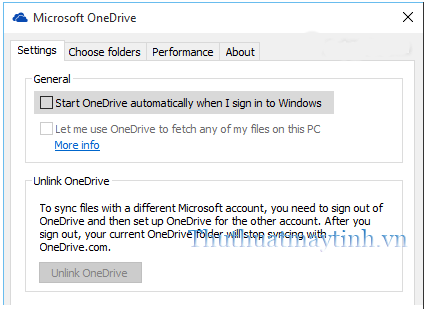
3. Click the OK button and restart your computer.
Now OneDrive will never start automatically on your Windows 10 computer.
Method 2: Disable OneDrive from Startup using Task Manager
You can ask the help of the Task Manager program to disable OneDrive from system startup:
1. Press Ctrl + Shift + Esc keys together to open Task Manager. You can also open it by right-clicking on the Taskbar and selecting Task Manager.
2. Now go to the ” Startup ” tab in Task Manager, select ” Microsoft OneDrive “ specific item in the list and click on the ” Disable “ button.
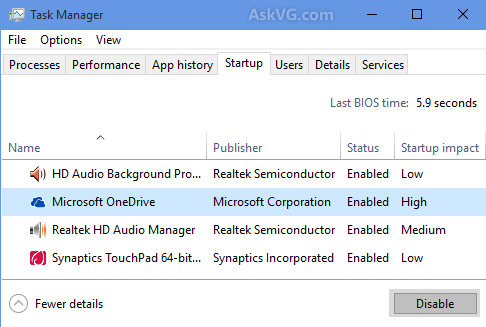
3. That’s it. Restart your computer, and OneDrive will no longer start with Windows.
Deleting the OneDrive icon is the most straightforward task. You won’t need to own any Registry Key, and you won’t need to reboot or sign out. Changes will be immediate.
You can remove OneDrive icons from the Navigation Pane using the following instructions:
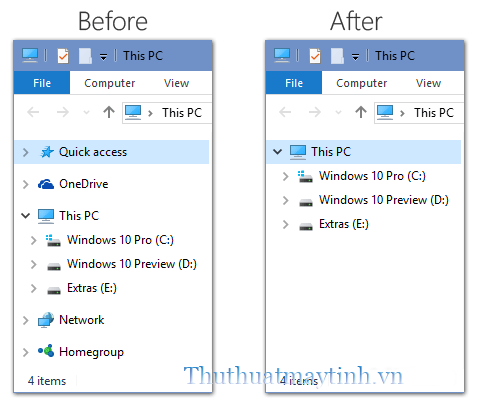
Deleting the OneDrive icon is the easiest task. You won’t need to own any Registry Key, and you won’t need to reboot or sign out. Changes will be immediate.
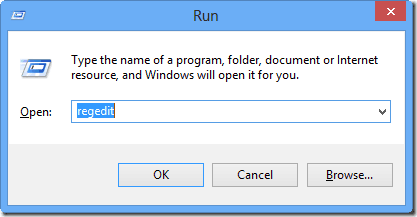
1. Press the WIN + R key combination to open the RUN dialog box. You can also open it from the WIN + X menu. Now type regedit in the Run dialog box and press Enter. It will open Registry Editor.
2. Now go to the following Key:
HKEY_CLASSES_ROOT CLSID {018D5C66-4533-4307-9B53-224DE2ED1FE6}
3. In the right pane, change the value of the System.IsPinnedToNameSpaceTree DWORD to 0
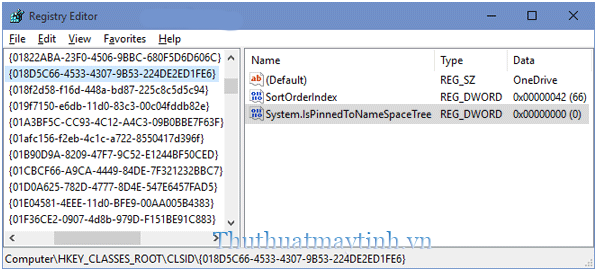
That’s it. It will immediately remove the OneDrive icon from the Navigation Pane in This PC.
If you want to restore the OneDrive icon, change the value of the System.IsPinnedToNameSpaceTree DWORD to 1 again.
NOTE: If you are using a 64-bit version of Windows 10, you may notice that the OneDrive icon is still present in the “Browse” dialog like Save, Save As, or Open in some 32-bit 3rd party programs 3. To remove the OneDrive icon from there, you also need to perform the same steps in the following Key:
HKEY_CLASSES_ROOT Wow6432Node CLSID {018D5C66-4533-4307-9B53-224DE2ED1FE6}
Just go to the Key mentioned above and in the right pane, change the value of the System.IsPinnedToNameSpaceTree DWORD to 0 to remove the OneDrive icon.
Method 4: Completely disable OneDrive in Windows 10 using Group Policy Editor
If you want to get rid of OneDrive in Windows 10 completely, you can disable all OneDrive functionality using the Group Policy Editor :
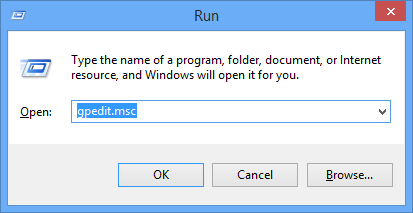
1. Press WIN + R keys together to launch the RUN dialog box. Now type gpedit.msc in RUN and press Enter. This will open the Group Policy Editor.
2. Now go to:
Computer Configuration -> Administrative Templates -> Windows Components -> OneDrive
3. In the right pane, double-click on the option “ Prevent the usage of OneDrive for file storage ” and set it to Enabled.
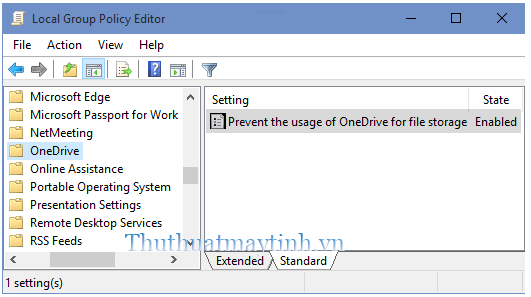
That’s it. Apply the change, and it will altogether disable the OneDrive functionality in Windows 10.
PS: If you decide to re-enable the OneDrive function in the future, double click on the ” Prevent the usage of OneDrive for file storage ” option and set it to Not Configured.
Method 5: Completely disable OneDrive in Windows 10 using Registry Editor
Windows 10 Home does not contain the Group Policy Editor. If you’re using the Home edition of Windows 10 or if you can’t use or don’t want to use the Group Policy Editor, you may close the Registry Editor’s help for similar tasks. Just follow these easy steps:
1. Press WIN + R keys together to launch the RUN dialog box. Now type regedit in RUN and press Enter. It will open Registry Editor.

2. Now go to the following Key:
HKEY_LOCAL_MACHINE SOFTWARE Policies Microsoft Windows
3. Create a new Key in Windows and name it OneDrive
4. Now, in the right pane, create a new DWORD DisableFileSyncNGSC and set the value to 1
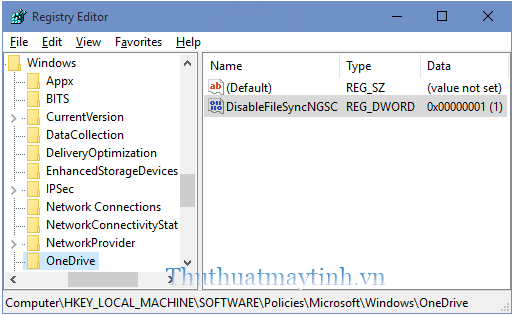
That’s it. Close Registry Editor and restart your computer to take effect. After restarting, the OneDrive functionality will be disabled in Windows 10.
PS: To re-enable the OneDrive function in the future, delete the DWORD DisableFileSyncNGSC created.


