By default, Windows 10 automatically downloads and installs the device driver software. But if you feel that a Driver is not working or Windows 10 does not automatically update Driver to the latest version, you can update Driver manually with just a few mouse clicks.
Device Manager in Windows 10 allows you to update the device driver software with ease manually. It checks if a newer version of Driver is available for a selected device and then downloads and installs it, if available.
If you don’t stop Windows 10 from automatically updating drivers, you probably have the latest Driver software version. But sometimes, the latest version of Driver is not installed automatically. Some Drivers take a long time to appear on Windows Update.
Method 1- Update Driver
Once you have an update for specific drivers installed on your computer, you can follow these steps to update them.
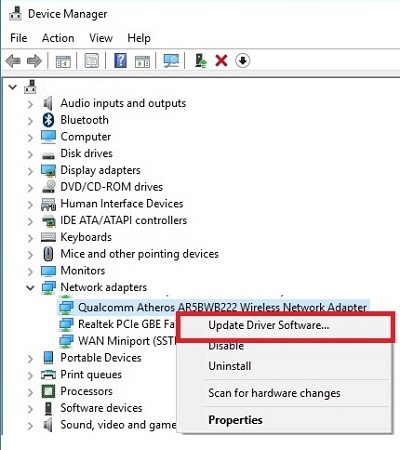
Step 1 Open Device Manager > Expand one of the categories and find device> right-click > Update Driver.
Method 2- Uninstall the Driver software
If you have Windows 10 Driver downloaded available, but it is not getting the update, you can uninstall and reinstall Driver.
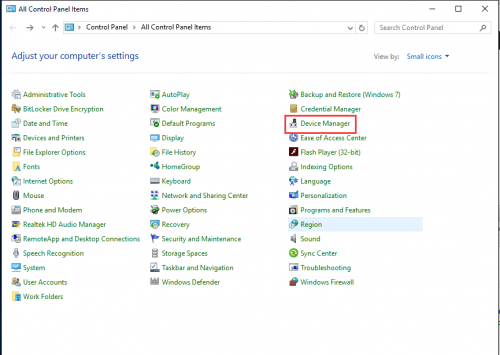
Step 1 Open Control Panel.

Step 2- Click on the small icon.
Step 3- Now click on Device Manager.

Step 4- Find your Driver in its category> right-click on it and Update Driver Software.

Step 5- Click Browse my computer to find Driver software or search automatically.
Step 6- Download the Driver File.

Step 7- Next to install the software.
Method 3- Automatically update Driver
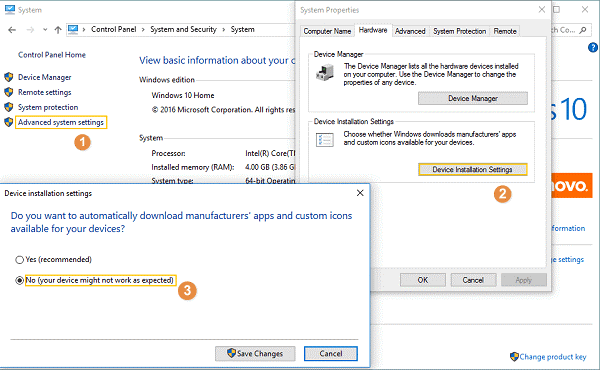
Step 1- Click Control Panel> System and Security> System> Advanced Settings.
Step 2- Click Hardware> select Device Installation.
Step 3- Select No> Save Change.

You should always update the driver manually so as not to damage the system. You can do it using any of the methods above easily and in real-time.
Thank you for reading this article on how to update the driver in Windows 10 manually. Comment below if you need any help.


