A diagonal line is used to divide the table’s header cell and name the row or column. It can make the data in the table more visible. How to insert diagonal lines into the table? This tutorial will show you different ways to do that.
Manually Inserting Diagonal Lines Into A Table In Word
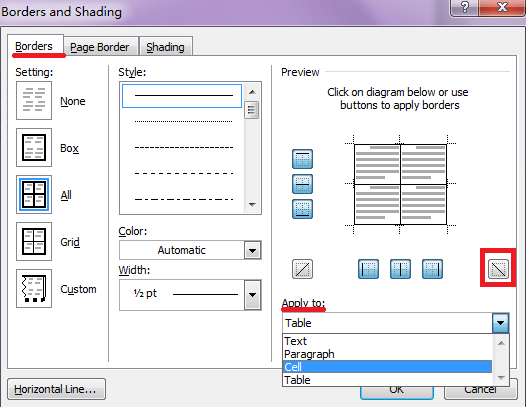
Users can insert the diagonal line into the table header by setting the table border and shadow. Do the following steps in Word2007 / 2010:
Step 1: Click the cell you want to insert a diagonal line into.
Step 2: Click the Design tab in Table Tools, click Borders in Table Styles ;

Step 3: Click the Borders tab, select Cell from Apply to drop-down list, click the diagonal button;

Step 4: Click OK.
If you want to insert different style diagonal lines into the table, please do as follows:
Step 1: Click on the Insert tab, click on the Shapes in Illustrations panel;

Step 2: Select
![]()
from Lines ;
![]()
Step 3: Draw the title with the pointer like drawing with a pen. You can paint any style you desire;

Insert Diagonal Lines Into Quick Table Title
Kutools for Word provides the easiest way to insert diagonal lines and caption for table header for Word 2007 and Word 2010.
Kutools for Word, an add-on, includes groups of tools to ease your work and improve word processing capabilities. Free trial for 45 days!
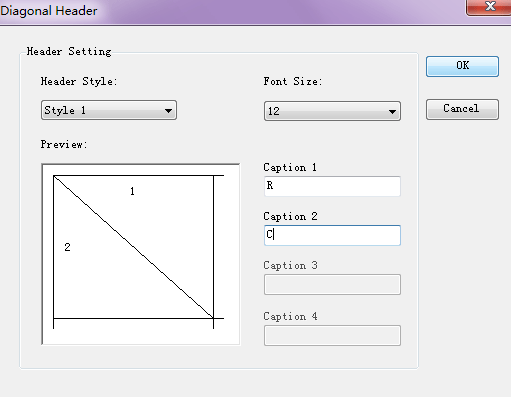
Click Kutools > click Diagonal Header in Table ;

After clicking Diagonal Header, Kutools for Word will display the Diagonal Header box. You can choose the Header Style and put the subtitles in it.

Set the Diagonal Header window, as shown above, click OK, see screenshot:


