A significant number of personal computer users often need to play photo slideshows. Most users use the Windows Photos Viewer or Photos app in Windows 10 to view photo slideshows.
But most users are unaware that you don’t need to open Windows Photo Viewer, photo application, or any other photo viewer to start a photo slideshow located in a folder. In short, you don’t need to manually open Windows Photo Viewer or the Photos app to create a slideshow in Windows 10.
Start an image slide show right from File Explorer in Windows 10
Having this feature in Windows 10 (also available in Windows 8) allows you to start a photo slideshow right from the folder where your photos are located. Meaning you don’t have to open a photo viewer yourself. And then click the slide show button to start the slide show.
Users who have used File Explorer without minimizing the Ribbon may be aware of this feature, but users who want to use File Explorer with minimized Ribbon may not detect this feature.
Follow the instructions below to start an image slideshow right from File Explorer in Windows 10.
Step 1: Open File Explorer and navigate to the folder containing the image.
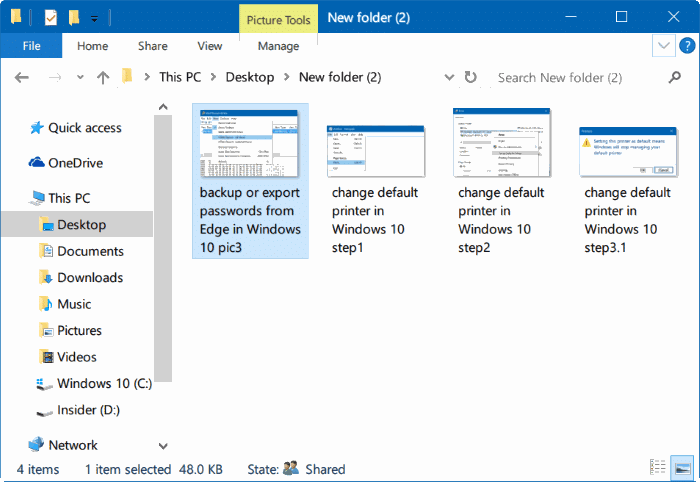
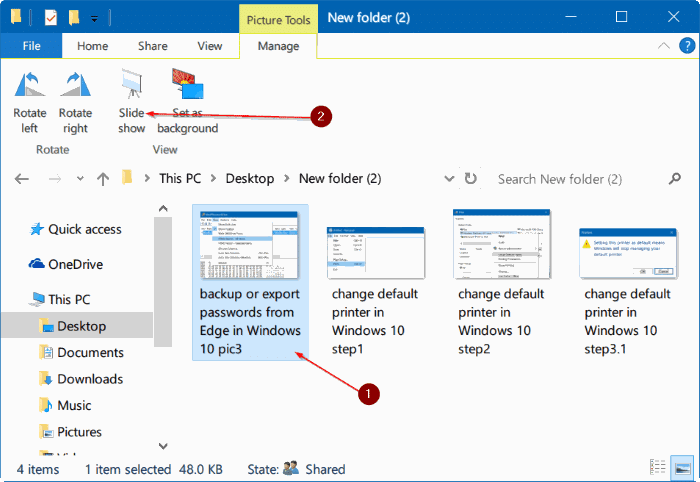
Step 2: After opening the folder, click on an image file to select it.

Step 3: Click the Manage tab in the Ribbon and then click the Slide show option to start slideshows of all images.

And if the Manage tab is missing or currently visible, it’s because you haven’t selected the photo file. Click the image file in the folder to see the Manage tab.
And if you want to include only specific images, please select the photos you want to see in the slide show and then click Slideshow Options.

I hope this helps you!
A significant number of personal computer users often need to play photo slideshows. Most users use the Windows Photos Viewer or Photos app in Windows 10 to view photo slideshows.
But most users are unaware that you don’t need to open Windows Photo Viewer, photo application, or any other photo viewer to start a photo slideshow located in a folder. In short, you don’t need to manually open Windows Photo Viewer or the Photos app to create a slideshow in Windows 10.
Start an image slide show right from File Explorer in Windows 10
Having this feature in Windows 10 (also available in Windows 8) allows you to start a photo slideshow right from the folder where your photos are located. Meaning you don’t have to open a photo viewer yourself. Then click the slide show button to start the slide show.
Users who have used File Explorer without minimizing the Ribbon may be aware of this feature, but users who want to use File Explorer with minimized Ribbon may not detect this feature.
Follow the instructions below to start an image slideshow right from File Explorer in Windows 10.
Step 1: Open File Explorer and navigate to the folder containing the image.
Step 2: After opening the folder, click on an image file to select it.

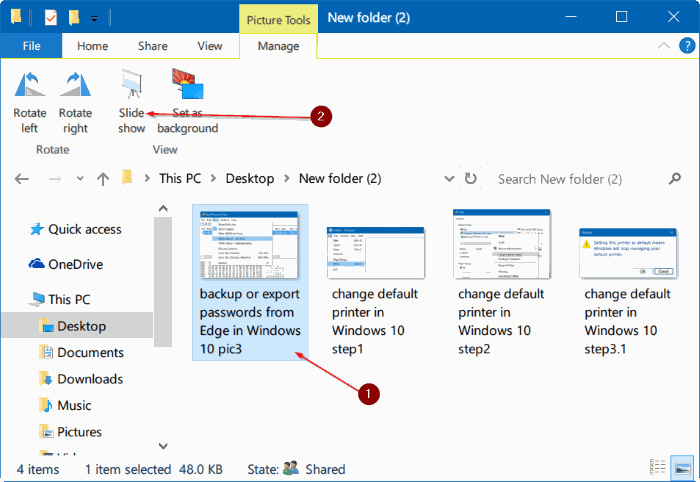
Step 3: Click the Manage tab in the Ribbon and then click the Slide show option to start slideshows of all images.

And if the Manage tab is missing or currently visible, it’s because you haven’t selected the photo file. Click the image file in the folder to see the Manage tab.
And if you want to include only specific images, please select the photos you want to see in the slide show and then click Slideshow Options.

I hope this helps you!


