Instructions to turn off Automatic Update in Windows 10 fast and simple
Windows 10 is a service, which means automatic updates are turned on by default, and your PC always has the latest and most excellent features. With automatic updates, you don’t need to search for updates online or worry that Windows’s critical fixes or device drivers might be missing on your computer. Windows Update automatically installs important updates as they become available. But some users will not want to update as it can take up the system and network resources while doing important work.
In Windows 8.1 and earlier, Microsoft allowed users to turn off automatic updates altogether. Unfortunately, in Windows 10, Microsoft does not provide general consumers with options to disable automatic updates. But there is a workaround to turn off automatic updates in Windows 10. Follow the steps below.
Method 1: Prevent automatic updates of Windows 10 with Local Group Policy Editor
If you run Windows 10 (Professional, Enterprise, or Education), you can use the Local Group Policy Editor to quickly change settings to prevent Windows 10 from automatically downloading and installing updates.
Here’s how to change the Local Group Policy Editor settings:
- Use the Windows + R keyboard shortcut to open the Run command.
- Type gpedit.msc and click OK to open Local Group Policy Editor.
- Browse to the following path: Computer Configuration Administrative Templates Windows Components Windows Update
- On the right side, double-click Configure Automatic Updates.
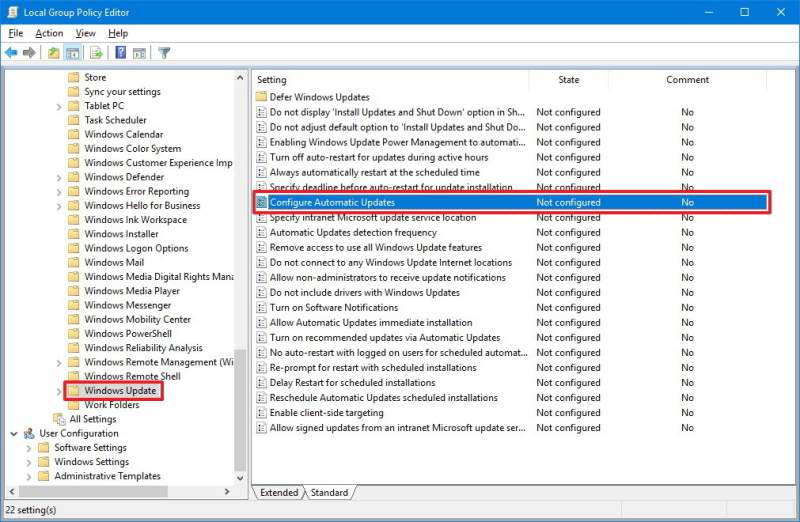
- On the left side, check the Enabled option to enable the policy.
- Under Options You will find several ways to configure automatic updates, including:
- 2 – “Notify for download and notify for install (Notify download and notify to install).”
- 3 – “Auto download and notify for install (Automatically download and notify to install).”
- 4 – “Auto download and schedule the install.”
- 5 – “Allow local admin to choose a setting.”
- It would help if you chose the update option you want to configure. If you select option 4, you can specify exactly when to install new updates. You can also choose to install the update during automatic maintenance at a specific date and time. You can even check the option to include other Microsoft product updates when updating.
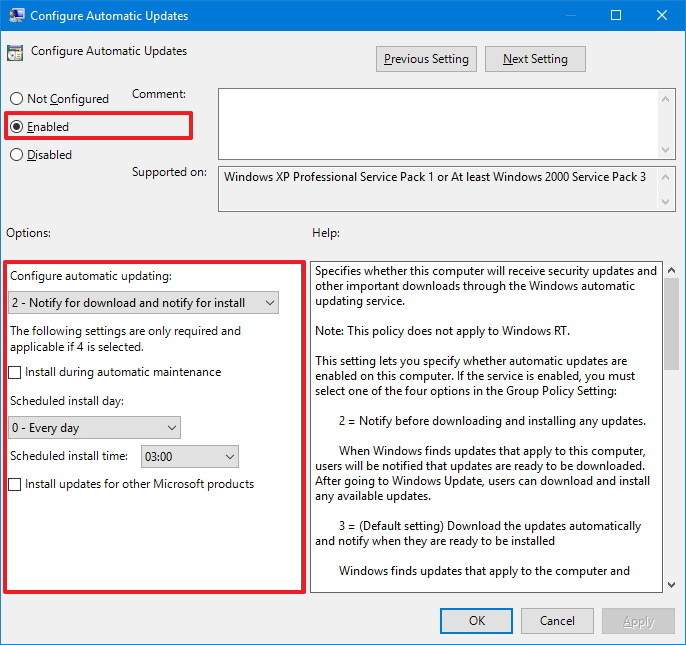
- Click Apply.
- Click OK to complete the task.
While you can choose from any of the options, your best option might be 2 – Auto download and notify for install. This option will not only prevent the operating system from downloading updates automatically, possibly saving data when using a watch internet connection, but you will receive notifications when new updates are available.
When a new update is released, you’ll get a notification in the Action Center, but the updates won’t download and install until you’re ready and do the following:
- Open Settings.
- Click Update & security.
- Click Windows Update.
- Click the Download button.
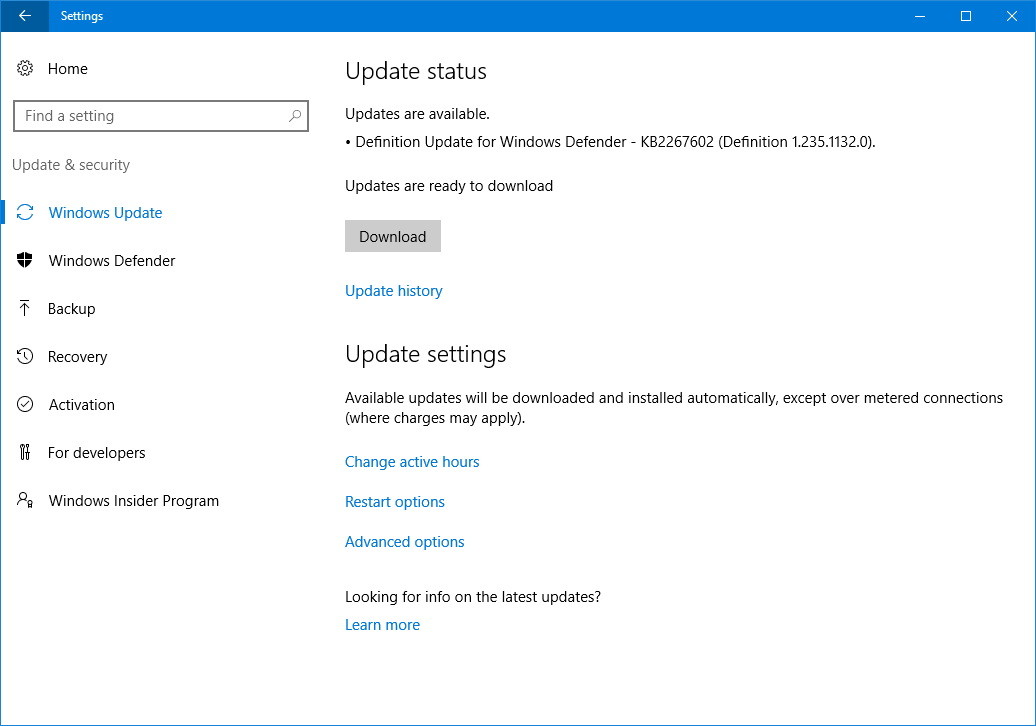
- Click the Restart button to complete the task.
Method 2: Prevent automatic Windows 10 updates using Registry
Instead of using Local Group Policy Editor, you can also change Windows 10 updates using Registry.
Important warning: Editing the registry is dangerous, and it can cause irreversible damage to your installation if you do not do it correctly. It is recommended that you take a full backup of your computer before proceeding.
- Use the Windows + R keyboard shortcut to open the Run command.
- Type regedit, and click OK to open the Registry.
- Browse to the following path: HKEY_LOCAL_MACHINE SOFTWARE Policies Microsoft Windows
- Right-click the Windows key (folder), select New, then press Key.
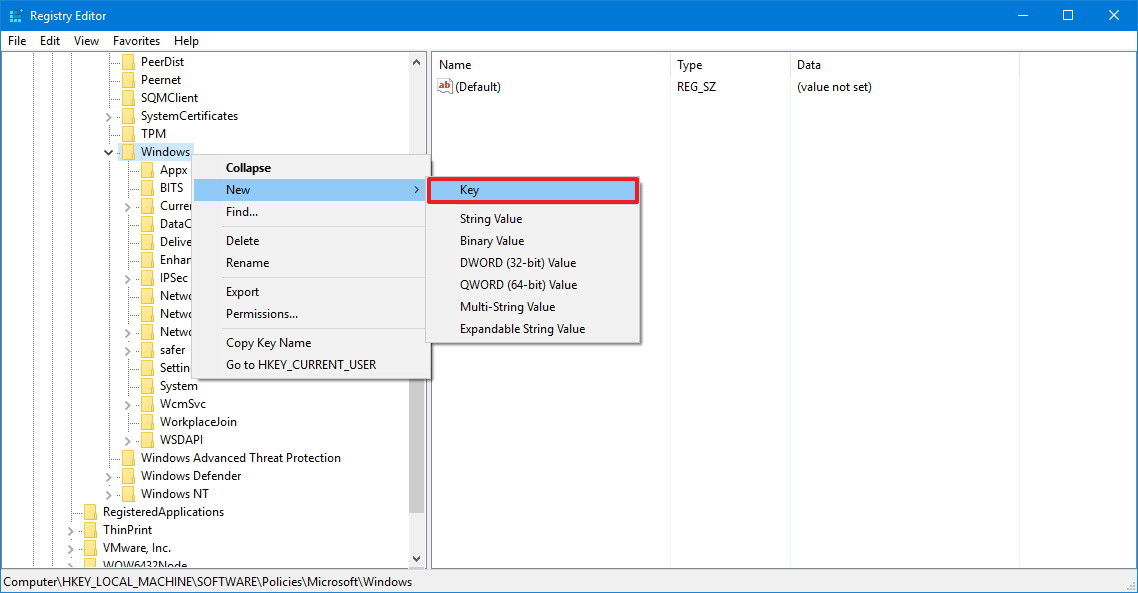
- Name the new key WindowsUpdate and press Enter.
- Right-click the newly created key, select new, and press Key.
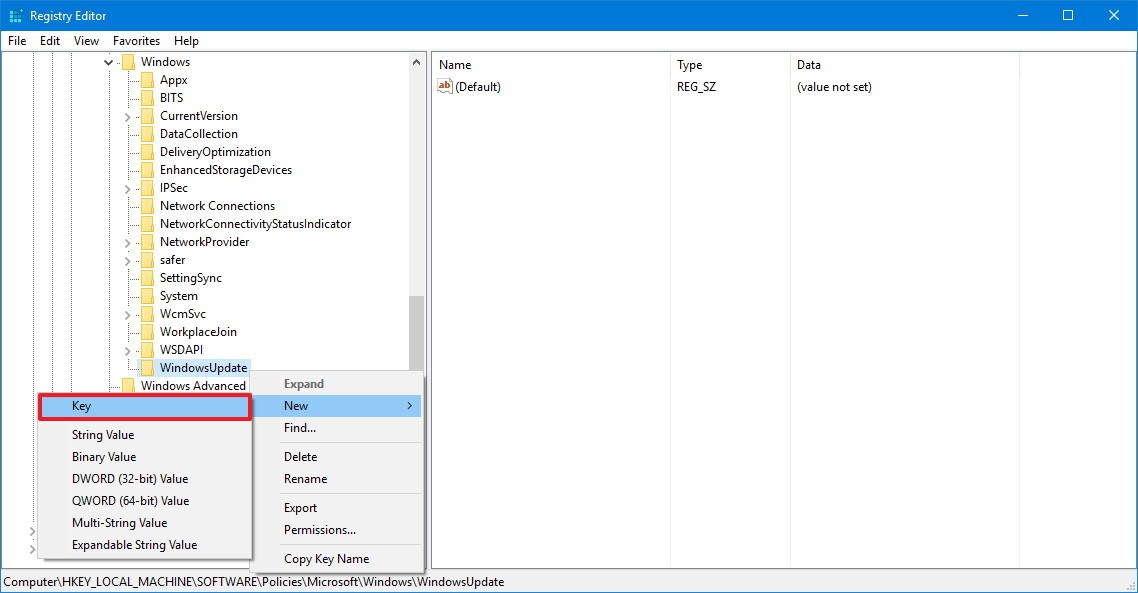
- Name the new key AU and press Enter.
- Inside the key just created, right-click on the right side, choose New, and click Value DWORD (32-bit).
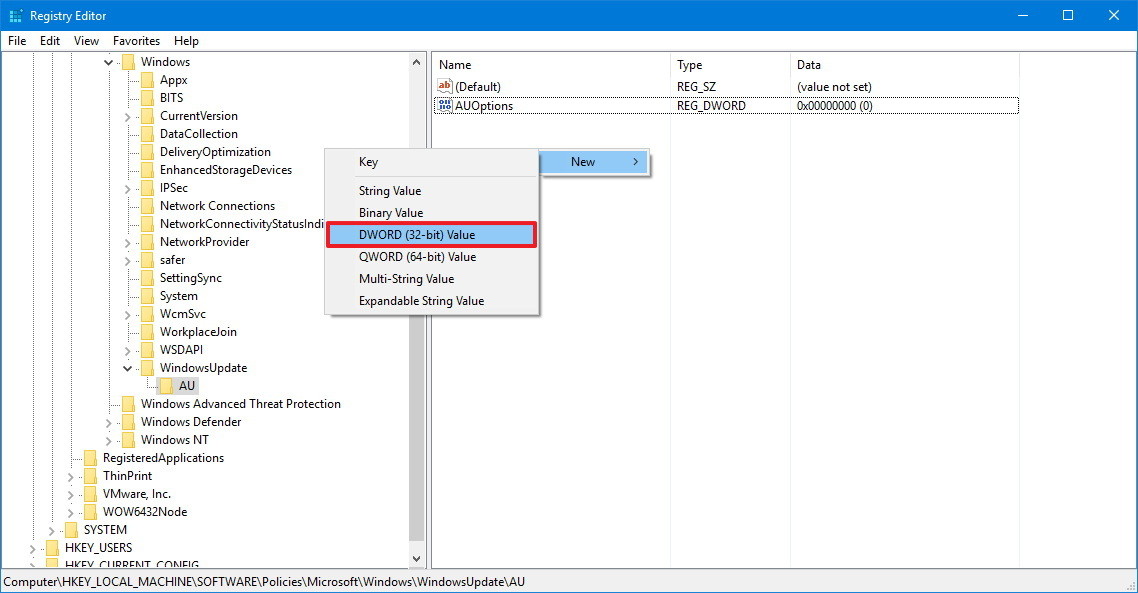
- Name the new key AUOptions and press Enter.
- Double click the newly created key and change the value using one of the following options:
- 2 – “Notify for download and notify for install.”
- 3 – “Auto download and notify for install.”
- 4 – “Auto download and schedule the install.”
- 5 – “Allow local admin to choose settings.”
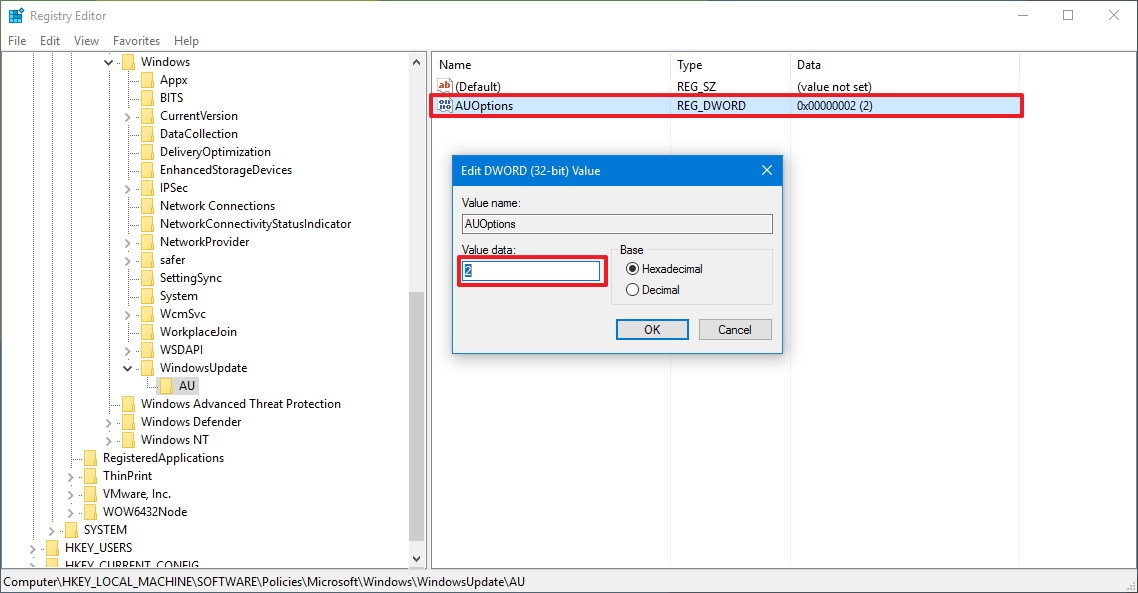
- Click OK.
- Close the Registry to complete the task.
Although you can use any of the built-in values, your best option is to change the value to 2 to configure the “Notify for download and notify for install” option. Use this value, so Windows 10 automatically downloads updates, and you’ll get notifications when new updates are available.
After tweaking the Registry, when receiving a notification in the Task Center. Still, when new updates become available, the updates won’t download and install until you’re ready and follow the steps:
- Open Settings.
- Click Update & security.
- Click Windows Update.
- Click the Download button.
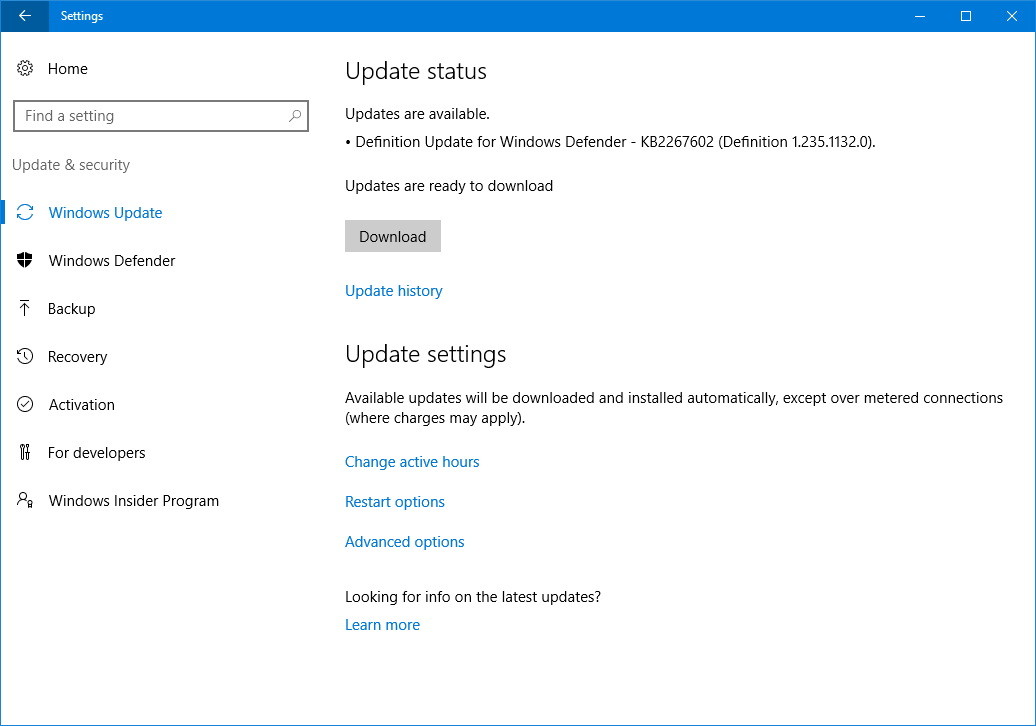
- Click the Restart button to complete the task.


